Completely Useless Fun Project: Parts Of The Compiler
Posted on Nov 8th, 2018 in Compilers
This week I am talking about the parts of the compiler, doing a deep dive into the Lexer and Parser and showing how to build the Lexer and Parser in Python. At the end of this post, we should have a working lexer and parser.
If you have done C/C++ or Objective-C work on MacOS (There is a project called GNUStep that allows you to run Obj-C on Linux), you may have heard of Clang and LLVM, or maybe Clang/LLVM. It may have confused you because there are two names for a seemingly single piece of software. It may confuse you further to point out that these are two different things, but two pieces to the same puzzle.
What Clang and LLVM are, are the pieces of a compiler. A compiler is really just a single group of processes that takes in some source code and outputs some other code. This output code could be Assembly code, Java ByteCode, hell even Javascript. Like all good programming problems, compiler construction can be broken down into various parts.
First, a history
It may horrify you to know that computer programs weren’t always written in english. For many decades, Programs were written by hand in assembly language. It wasn’t until 1952 that totally bad ass Rear Admiral Grace Hopper built the first compiler and coined the term (she also coined the term debugging after pulling a literal moth out of her computer’s circuits).
This first compiler wasn’t much of anything. It really just operated as more of a linker or a loader than what our modern compilers are. The first real modern compiler was introduced in 1957 by John W Backus and his team at IBM for Fortran.
And compiler design hasn’t changed all that much since then.
Design of the modern Compiler
The Fortran compiler was built in an era where computers were insanely expensive, huge and slow. In order for Fortran to compete with hand coding assembly, it needed to be fast, at least as fast as hand written code. To do this, the compiler was broken down into two parts: the frontend and the backend (that is what Clang and LLVM are, the frontend and backend respectively). This made it easier to apply transformations and optimizations independently.
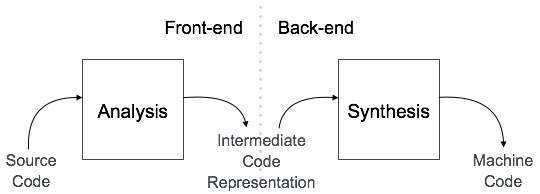
At the highest level, the frontend takes the source code and outputs what is called an Intermediate Representation or IR. This may look like assembly code, all though it doesn’t have to, but it isn’t. This code is how compilers internally represent the source code. IRs are used so that that it can be optimized and translated much easier. They also must be designed in such away that the intent of the original source code is preserved and be independent of any source or target language. IRs can be either data structures or textual code based outputs. Then the backend takes the IR and output its targeted language.
There are a few advantages to this design. The first is that this is super easy to optimize. You can optimize your IR independently of your target language and vice versa, creating an insanely fast program. The real power, however, is that you can make your compiler as portable as possible. For example, since your frontend deals with breaking the backend down, you don’t need to re-implement this part of the application. If you want to target Intel’s x86 architecture and ARM architecture with your programming language, all you need to do is replace the backend of the compiler. In fact, this is how GCC and compilers built on LLVM works.
Again, for this compiler, I am building the frontend of the compiler and then going to let LLVM handle the output.
Breakdown of the frontend of the compiler
Like all problems in programming, the frontend of the compiler can further be broken down into its own parts.

The steps the frontend needs to transform your language into its IR are Lexical Analysis, Syntactic Analysis and Semantical Analysis. Lexical analysis, aka lexing is the process of taking a stream of characters and converting it into a stream of tokens. Tokens are really just a pair that describes what certain what a sequence of characters means, and the value of the characters. For example the string let foo = 1 might have the following tokens: ("LET", "let"), ("NAME", "foo"), ("EQ", "="), and ("NUMBER", "1"). The result of the lexical analysis then goes into the next phase.
And that next Phase is Syntactical analysis. Syntactic analysis, also known as parsing, is when you take a stream of tokens and find out what they all mean. This is basically how you describe the grammar of your language. This is how languages know that both (2 * 5) + (6 * 2) and 10 + 12 are valid statements. After this Syntactic Analysis is done, the compiler moves on to semantical analysis.
In this step, the compiler figures out what the individual statements mean. This step involves your abstract syntax tree, otherwise known as an AST. This is the step that understands that when you write 1 + 1 that you want to add the two numbers. The parser from the last step builds up your AST so that you could easily traverse this tree and output your IR.
Arbor’s Lexer
So now that we understand the parts of the compiler a little bit better, let’s discuss putting this into code, specifically the lexer. If you want to check out some of the code written during this post, the GitHub repo can be found here: radding/Arbor. If you want to see the parts specific to this post look at the file src/lexer/__init__.py.
The only thing you need to install to start building your own lexers and parsers is PLY. Ply is a great library that implements the popular lex and yacc tools in Python. Lex is the tool that you use to build out your lexer and Yacc, which stands for Yet Another Compiler Compiler, is what you use to build your parser.
To install Ply all you really need to do is run pip install pip. If you want to run the Arbor code, you can simply clone the GitHub Repo and install the requirements.txt file by running pip install -r requirements.txt. After that is all set up, we can move on to actually building some stuff.
The Lexer
The first step to building the lexer is thinking about the symbols you need and the patterns they have. Ply uses regular expression in order to match the characters to their proper token types. Some tokens are incredibly simple, a single character for example. Some are a bit more complex. Take for example the regular expression for a plus symbol. It is literally r'\+. However look at the regex for something like a variable name: r'\b[a-zA-Z_]+([a-zA-Z0-9_])*\b'.
While this is by no means complete, and I would expect this to change over time, some of the tokens we need are math operators (plus, minus, etc), comparison operators (<, >, <=, etc), a variable name token, tokens for our reserved words (let, const, if, else, return, etc), parentheses, numbers (float, integer, hex, and octo), and the arrow.
Quick primer on Regular Expressions
A regular expression is really just an expression that searches some input string for the pattern. Regular Expressions are insanely powerful and power a lot of different applications, for example email or phone validation. To build a regular expression, I would recommend using something like regex101.com to test what you think is a valid regular expressions.
A common Regular expression is [a-zA-Z0-9]. The brackets mean match anything inside of these two brackets. So the previous pattern will match any letter, uppercase or lowercase, or number that is between 0 and 9. If you want to match any character more than once you can write something like [a-zA-Z0-9]{2} which will execute the match exactly twice.
But often times you find yourself wanting to match an unknown number of times. For that, you could use the + or * operators. The + operator means match one or more times and the * matches zero or more times. There is also the question mark which means zero or one times.
This is by no means a comprehensive or even good intro to regular expression, but it is still necessary to be able to read these for what comes next. Here is a link to a much better regular expression tutorial
Know that we all understand regular expressions a little bit, let’s define our lexer. Of course the first step is to import Ply. On the top of the lexer file (which in Arbor is src/lexer/__init__.py) import Ply like so: import ply.lex as lex. Technically you are importing the lexer only and not Ply as a whole, and that’s what we want.
Next I like to set up some code that helps us debugs and one line in particular is very important to the rest of the compiler. At the very bottom of the page, you need to instantiate a lexer. This is easy enough: lexer = lex.lex(). The lexer instantiated here is what the parser will use to tokenize your input. This next function, while not required, is essential to be able to run our lexer independently of the parser:
def lex(data):
    lexer.input(data)
    # Tokenize
    tokens = []
    while True:
        tok = lexer.token()
        if not tok:
            break      # No more input
        tokens.append(tok)
        pass
    return tokens
Here, data is the string I want to tokenize. What this function does is tokenize the input, iterates until there are no more tokens, and appends the tokens to some list. I use this function to test my lexer in my unit tests (that code can be found here: tests/lexer/TestLexer.py), and you can use this function to do what ever you want to the stream of tokens. Another common use is to just print out the individual tokens.
To define our real tokens, we have to do two things. The first is set up a list of tokens called tokens. These are just the names of the tokens, with out the pattern. Ply uses this list in order to recognize tokens while the lexer is analyzing a string. My list of tokens looks like this:
tokens = [
    "INT",
    "FLOAT",
    "PLUS",
    "MULTI",
    "DIV",
    "SUB",
    "NAME",
    "LPAREN",
    "RPAREN",
    "COLON",
    "COMMA",
    "SEMICOLON",
    "ARROW",
    "EQ",
    "OCT",
    "HEX",
    'GT',
    'LT',
    'GTE',
    'LTE',
]
It is a kind of standard to make your token names all upper case, and it also helps you denote what is a parser expression and what is a token when we move on to the parser.
After the list of tokens is defined, you can define your reserved keywords. The easy way to do this is to define a dictionary with your reserved word as the key and the token name as the value. For example, if the only reserved keyword is foofoo and its token is FOOFOO then our reserved keyword dict would look like this: "foofoo": "FOOFOO". After that dictionary is defined, all we need to do is append it to the tokens list. and that is trivial: tokens += list(reservedKeyWords.values()). Your code should look similar to this:
reserved = {
    'if' : 'IF',
    'else' : 'ELSE',
    'done' : "DONE",
    'return': "RETURN",
    "const" : "CONST",
    "let": "LET",
    'int': 'INTTYPE',
    'float': 'FLOATTYPE',
    'char': 'CHARTYPE',
    'function': 'FUNCTIONTYPE',
}

tokens += list(reserved.values())
Finally, we can define the patterns for our tokens. There are two ways we can define a pattern: either using a regular expression string, or by using a function that has a regular expression as its docstring. Whether you use a function or a string, both must start with a t_. So a token to define integers would look like: t_INT = r'[0-9]+. One important thing to note, is that tokens are resolved in the order the appear. If you have these two rules:
t_SINGINT = r'[0-9]'
t_INT = r'[0-9]+'
and you give the lexer this input: '9' it will resolve to SINGINT, even if they are both valid.
Another thing to consider is when to use functions rather than strings. I use functions when I want to do something a bit more complex than matching. Every other time, I just use strings. For example, handling reserved keywords. The pattern to handle names is r'\b[a-zA-Z_]+([a-zA-Z0-9_])*\b'. This will match everything that looks like a variable name. It will match aBrA32fdfareq_Reqdasf and it will match return. In order to make sure the token resolves correctly, inside of the t_NAME function, I have code that checks the dictionary for the word. If the word is resolved, then I change the type of the token. Else I simply keep the token the same. Here is my t_NAME function:
def t_NAME(t):
    r'\b[a-zA-Z_]+([a-zA-Z0-9_])*\b'
    print("this is a name:", t.value)
    t.type = reserved.get(t.value, "NAME")
    return t
All functions must return a token if you want to use that token later. You can return nothing and that pattern will be ignored (not put on the token stream).
One place this is really useful is comments and tracking line numbers. To track line numbers, I just have a pattern that matches \n+ and adds the number of newlines to the lexer’s lineno variable:
def t_NEWLINE(t):
    r'\n+'
    t.lexer.lineno += len(t.value)
    pass
For comments, I don’t even do anything in the function:
def t_BLOCKCOMMNET(t):
    r'/\*(.|\n)*\*/'
    pass

def t_COMMENT(t):
    r'//.*'
    pass
Two last important things to speak about are ignoring certain characters and handling lexing errors.
You don’t want to define a token for every. single. character. But if you don’t tell the lexer about a character, the Lexer dies. So you can define a function that matches the pattern you want to ignore. Or you can make a string, called t_ignore, to tell the parser to ignore some characters. Here I ignore things like spaces or tabs. You can write this to ignore anything you want but it must be a string!
Finally, you may want to handle errors. To do this, you can use the t_error function. In this function, you can tell the lexer to do many things. If you want the lexer to skip any character that causes then lexer to die, you can can tell the lexer to skip it. You can also just log the error and quit the lexer, which is what I do.
After you define all of your tokens, you should be able to run your code. If you wrote a lex function like the one I showed earlier, all you really need to do is pass in a string and you can print out the token stream.
The Wrap up.
In this post, we learned how build a lexer using Python. The initial idea was to write about both the Lexer and Parser this week, but this article went a little long. Next week I will definitely talk about the parser and how to build it in python.
The code for Arbor’s lexer can be found in the GitHub repo specifically here. If you have any questions or comments, feel free to reach out to me on twitter or through email, or even the comments!